Key cloak is a powerful tool used by most Java development companies for managing user authentication and authorization in their applications. However, as a Java developer, you may notice, that the default registration page provided by Key cloak might not suit your specific needs. So, what should be done in such a case? This is what we are going to unveil in this blog.
Here, we’ll explore how to replace the standard Keycloak registration page with three custom pages, each created using FormAuthenticators and FormAction SPIs. This customization will allow you to tailor the registration process to your application’s requirements.
Understanding Form Authenticators and Form Action SPIs
Before we dive into the customization process, let’s get acquainted with the key components:
- FormAuthenticators: These are custom components responsible for rendering and processing HTML forms in Keycloak. You can create multiple FormAuthenticators to handle different steps of the registration process.
- FormAction SPIs: FormAction SPIs work in conjunction with FormAuthenticators to control the registration process flow. Each FormAction SPI corresponds to a specific FormAuthenticator and helps orchestrate the registration flow.
The way both these classes work together is that each FormAction that is a child of this FormAuthenticator, will have its buildPage() method call first, then the FormAuthenticator.render() method will be invoked. This gives each FormAction a chance to add information to the form in an independent manner.
Creating Custom Form Authenticator
Firstly, we will implement two interfaces, FormAuthenticator and FormAutheticatorFactory.
From the FormAuthenticatorFactory interface, we will implement these methods – create, getId, getDisplayText, and getRequirementChoices.
The create method is used to return the instance of our Custom Form Authenticator.
@Override
    public FormAuthenticator create(KeycloakSession session) {
        return this;
    }
The getId method is used to set the id of our custom form authenticator provider for Keycloak to access it.
public static final String PROVIDER_ID = "form-1";
@Override
    public String getId() {
        return PROVIDER_ID;
    }
The getDisplayText method is used to show a familiar name in the admin console.
@Override
public String getDisplayType() {
    return "Registration Form 1";
}
The getRequirementChoices method is used to set the requirement. Possible values are – REQUIRED, CONDITIONAL, ALTERNATIVE & DISABLED
In our case, we just set it to Required because the form is mandatory to fill.
private static AuthenticationExecutionModel.Requirement[] REQUIREMENT_CHOICES = {
        AuthenticationExecutionModel.Requirement.REQUIRED
};
@Override
public AuthenticationExecutionModel.Requirement[] getRequirementChoices() {
    return REQUIREMENT_CHOICES;
}
Next, we implement the method of the FormAuthenticator interface which is the render method.
@Override
public Response render(FormContext context, LoginFormsProvider form) {
RegisterBean rb = new RegisterBean(new MultivaluedHashMap<>(), context.getSession());
//legacy bean for static template
form.setAttribute(“register”, rb);
return form.createForm(“form-1.ftl”);
}
This method first creates a RegisterBean object. Then sets it as a form attribute and returns a form using the createForm method of the LoginFormsProvider class which takes the FTL file’s name as input.
Creating Custom Form Action
Here, we will implement FormAction and FormActionFactory.
For the FormActionFactory we will implement the same methods as we did for the FormAuthenticatorFactory.
After that, for the FormAction interface, we will implement the following methods
The buildPage method – this method is called before the FormAuthenticator.render method so that any additional attributes that are needed for the form can be set from here.
The requiresUser method – this method will always return false for registration
The validate method – this method is called first for form processing. It validates the user inputs and challenges again if there are any errors.
An example of the validate method :
@Override
public void validate(ValidationContext context) {
    MultivaluedMap<String, String> formData = context.getHttpRequest().getDecodedFormParameters();
    List<FormMessage> errors = new ArrayList<>();
    context.getEvent().detail(Details.REGISTER_METHOD, "form");

    // Checks whether the username field is blank
    if (Validation.isBlank(formData.getFirst("username"))) {
        errors.add(new FormMessage(("username", Messages.MISSING_USERNAME));
    }

    // Checks whether the password field is blank
    if (Validation.isBlank(formData.getFirst(("password"))) {
        errors.add(new FormMessage(("password", Messages.MISSING_PASSWORD));
    }

    // Checks whether the password and confirm-password fields have same input
    else if (!formData.getFirst("password").equals(formData.getFirst("password-confirm"))) {
        errors.add(new FormMessage("password-confirm", Messages.INVALID_PASSWORD_CONFIRM));
    }

    // Check whether there are any errors – if yes then send context.error
    // else call context.success
    if (errors.size() > 0) {
        context.error(Errors.INVALID_REGISTRATION);
        formData.remove("password");
        formData.remove("password-confirm");
        context.validationError(formData, errors);
        return;
    } else {
        context.success();
    }
}
The success method – this method is called after the validate method call is successful.
An example of the success method:
@Override
public void success(FormContext context) {
    MultivaluedMap<String, String> formData =
        context.getHttpRequest().getDecodedFormParameters();

    context.getAuthenticationSession()
        .setAuthNote("username",formData.getFirst("username"));
    context.getAuthenticationSession()
        .setAuthNote("password",formData.getFirst("password"));
    context.getAuthenticationSession()
        .setAuthNote("password-confirm",formData.getFirst("password-confirm"));


}
KeyCloak does not natively provide multiple registration forms support, so to retain the data filled in the previous form we need to set the data in the AuthenticationSession as an AuthNote of the current user. We can retrieve the data in future from the AuthNotes.
After implementing the CustomFormAuthenticator and CustomFormAction we also need to add an FTL file with the required fields (refer register.ftl provided by KeyCloak) which will be used to render the registration form.
Similarly, create Form Authenticator and Form Action for every Registration Page. For the last page there will be some additional code in the render method and the success method.
@Overrides
public Response render(FormContext context, LoginFormsProvider form) {
    RegisterBean rb = new RegisterBean(new MultivaluedHashMap<>(), context.getSession());
    //legacy bean for static template
    form.setAttribute("register", rb);
    AuthenticationSessionModel authenticationSession =
	context.getAuthenticationSession();
    form.setAttribute("username",authenticationSession.getAuthNote("username"));

    return form.createForm("form-1.ftl");
}
On the last page, we need to provide the username before rendering.
@Override
    public void success(FormContext context) {

        AuthenticationSessionModel authenticationSession =
		context.getAuthenticationSession();
        context.getUser().setEmail(authenticationSession.getAuthNote("email"));
        context.getUser().setFirstName(authenticationSession.getAuthNote("firstName"));
        context.getUser().setLastName(authenticationSession.getAuthNote("lastName"));
        context.getSession().userCredentialManager()
               .updateCredential(context.getRealm(), context.getUser(),  UserCredentialModel.password(authenticationSession.getAuthNote("password")));
        context.getUser().setSingleAttribute("dateOfBirth",authenticationSession.getAuthNote("dateOfBirth"));

    }
In the success, we set the user details in the KeyCloak’s UserModel. Email, First Name, and Last Name are part of UserModel’s variables therefore they have a dedicated setter method. For the date of birth, the UserModel does not have a dedicated variable therefore it is set as an additional attribute in the UserModel.
The password is set in the UserCredentialManager and NOT in the UserModel.
Also, in the FTL file of the Last Form we need to add the username field. It is not necessary to make it visible to the user.
After creating all the FormAuthenticators and FormActions, its time to add them to the META-INF/services/ directory.
Create a file named org.keycloak.authentication. Form Authenticator Factory and this file must list the fully qualified class names of each Form Authenticator Factory implementation. For example:
com.example.keycloak.CustomRegistrationPageOne
com.example.keycloak.CustomRegistrationPageTwo
com.example.keycloak.CustomRegistrationPageThree
Similarly, create a file named org.keycloak.authentication.FormActionFactory and list all the FormActionFactory implementations.
com.example.keycloak.CustomFormActionOne
com.example.keycloak.CustomFormActionTwo
com.example.keycloak.CustomFormActionThree
These services/ files are used by Keycloak to scan the providers it has to load into the system.
Creating JAR and Deploying
The next step in customizing KeyCloak is to create the JAR and copy it to the server’s deployment directory i.e., the providers/ directory.
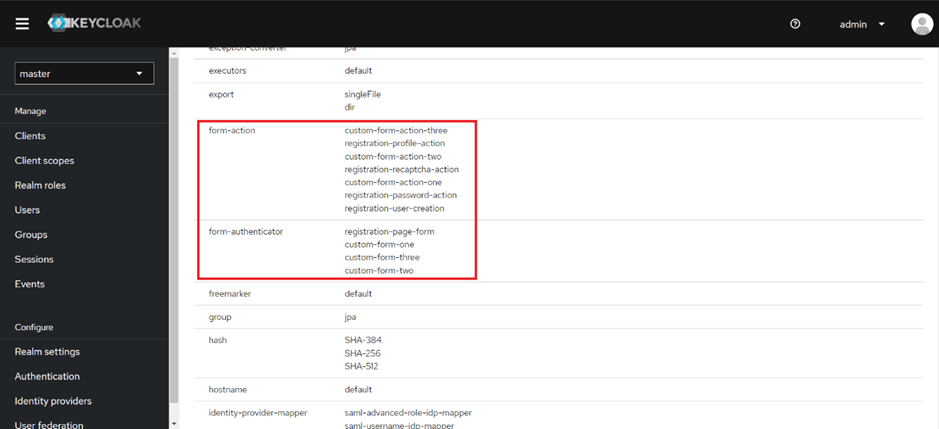
After running the keycloak server you should see your spi implementations in the server info page of the admin console like this.
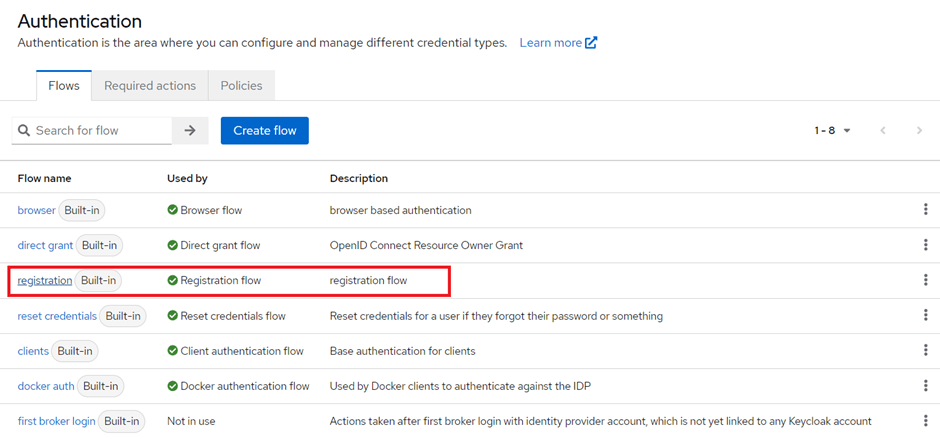
Configuring the Registration Flow
Go to the Authentication Settings in the admin console and select the default registration flow provided by keycloak.
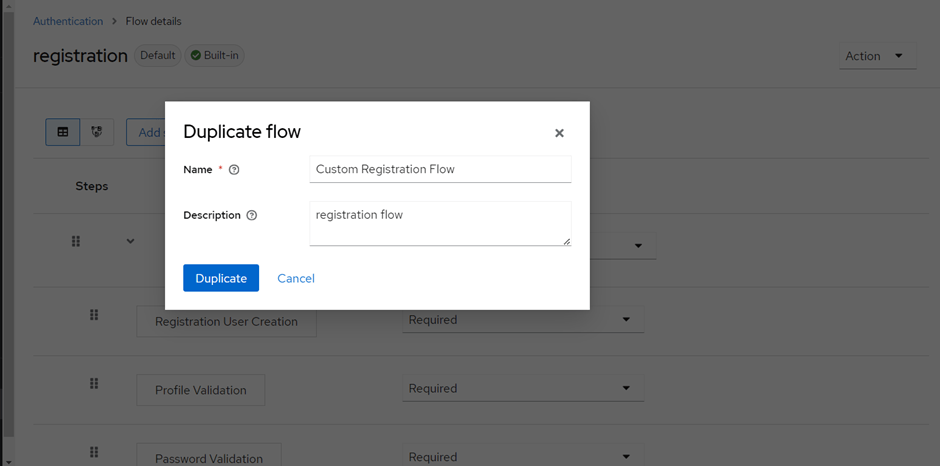
Create a Duplicate flow from the default registration flow.
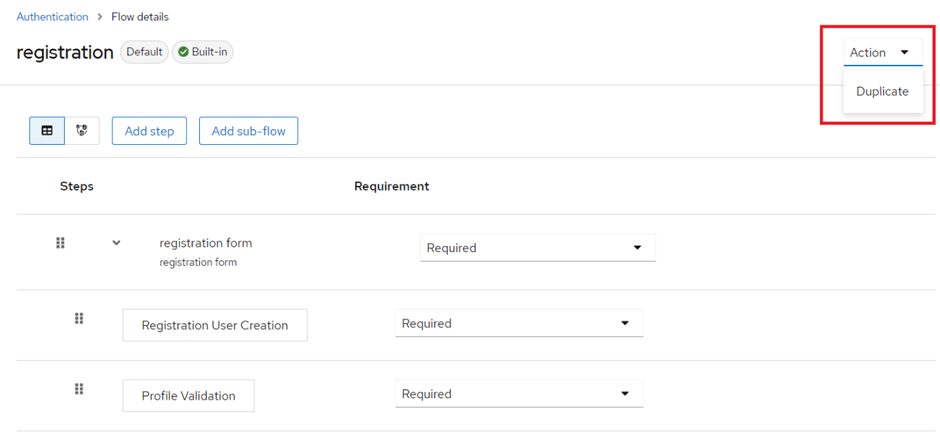
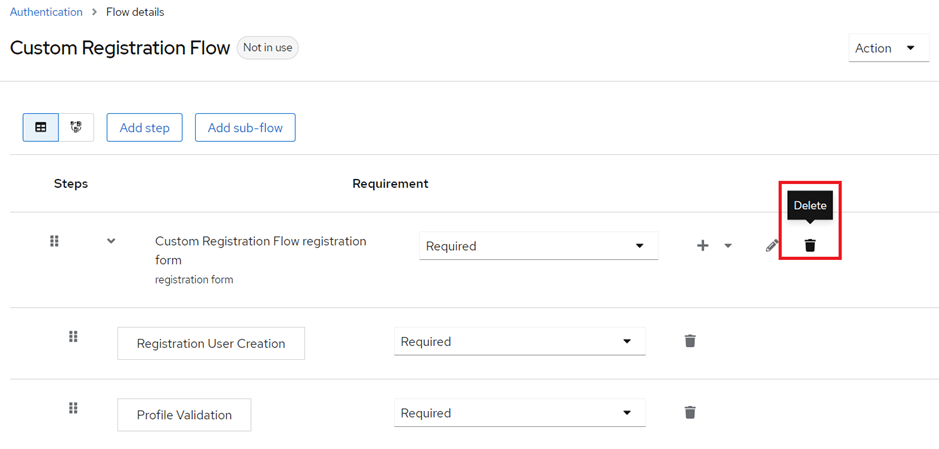
Delete the existing sub-flow.
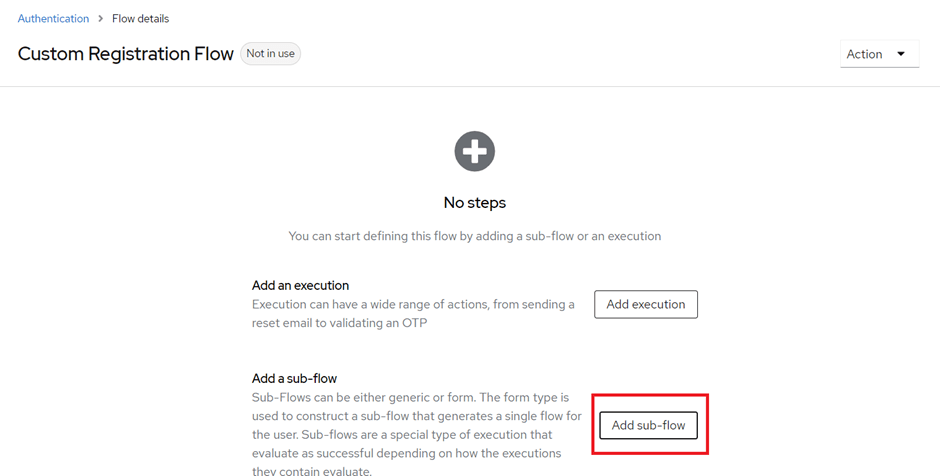
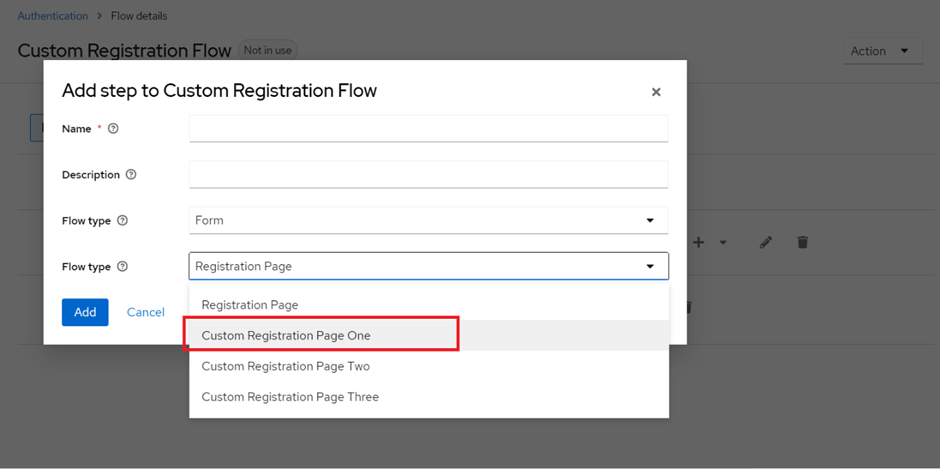
Add a new sub-flow. Select Flow-type as “Form” and Select your Custom Registration Page from the Drop-down.
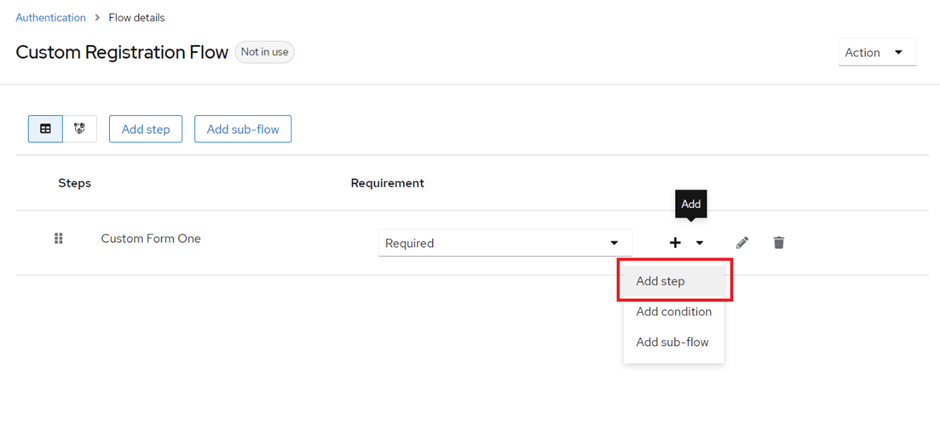
After, adding the sub-flow add a step in the sub-flow and select your corresponding Form Action for that form.

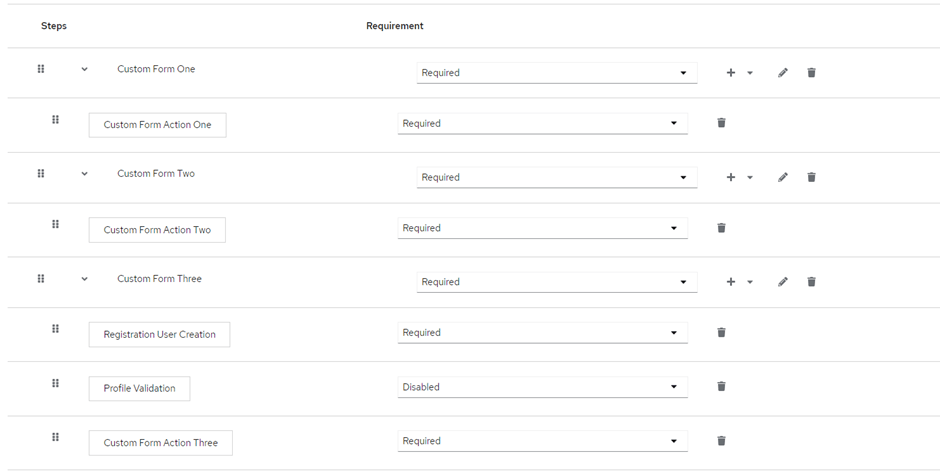
In the last sub-flow keep in mind to add the “Registration User Creation” step as the first step and after that you can add your custom form action.
After adding all the sub-flows and form actions the registration flow will look something like this.
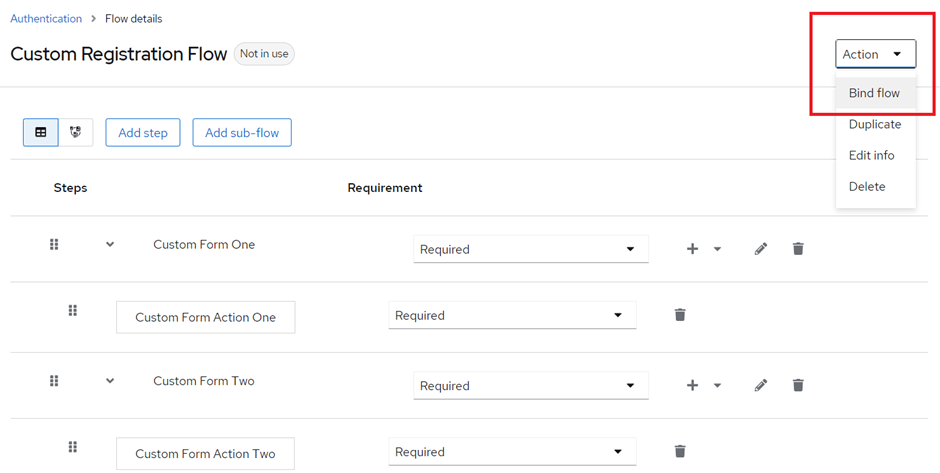
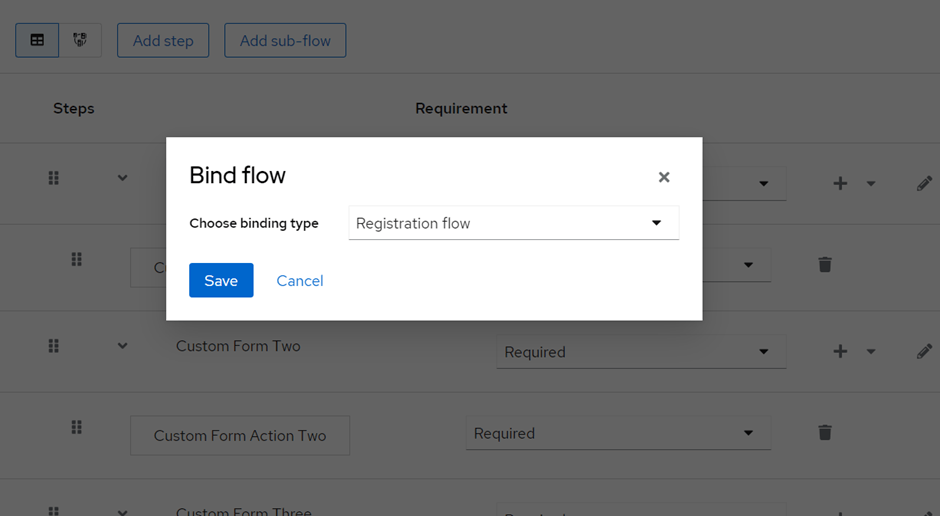
Now, for the last step, we need to bind our custom flow to the registration flow.
Conclusion:
In this blog, we learned about replacing the Keycloak registration page with custom pages using FormAuthenticators and FormAction SPIs offer the flexibility to create a tailored registration experience for your users. This customization aligns Keycloak with your application’s unique requirements and enhances the user onboarding process. I hope you find this information useful in